Our farmhouse cheddar cheese – now, please keep in mind that I AM NOT A PROFESSIONAL at anything much less making cheese. We love cheese around here like most people do. Cheese is expensive, especially good cheese.
So, we decided to try our hand at making our own. This is a skill I will need to know when we construct the mud hut…..oh the mud hut (drifting off to dreamland)…..and when we build the mud hut we will also have a milk cow or two. It only makes sense to learn how to do this now right. We buy fresh milk from a friend of ours, so we have an abundance of raw milk. I’ve experimented with some mozzarella (have yet to find one that I really like – although they are getting better), Ricotta cheese (easy peasy), yogurts, butter, buttermilk (both cultured and sweet cream), cream cheese (not impressed yet – still a work in progress) and sour cream.
We’ve tried a couple of farmhouse cheddar cheese recipes – the first one was simply awful, the chickens loved it. The next attempt was better, but had a distinct sour flavor. It was still better than the first attempt. Finally a recipe we liked. This particular recipe can be eaten within just a few days or waxed and set out to age. Ours barely makes it through the 3 or 4 days drying time.
Making cheese is time consuming – not difficult, just time consuming. I recommend making cheese on a day when you have nothing else planned.
Alright, let’s get this party started. Y0u’re going to need some supplies.
About two gallons of raw milk (you can use the other stuff, but why would you? If you HAVE to use store bought milk, get non-ultra-pasteurized and organic.)
Rennet (if you need some liquid rennet DO NOT use Junket rennet tablets, I have not had any luck with these)
Mesophillic culture (this is the mesophilic culture I use)
Cheese salt (this is a non-iodized fine cheese salt)
Digital thermometer
pot large enough to hold milk
pot large enough to hold the pot full of milk
cheesecloth if you have it (I use an old pillow case)
cheese press of some sort
When you have everything gathered up, it’s time to get started:
2 gallons raw milk
1 package mesophilic culture
1/2 teaspoon rennet mixed with 1/4 cup of water
1 1/2 Tablespoons cheese salt
Add milk to pot, fill other pot with water. Create a double boiler type set up. Heat milk to 90 degrees.
Add culture and stir until dissolved. Cover pot and allow to ripen for 45 minutes. This is an important step. Keep milk at 90 degrees.
Time to add the rennet. Mix rennet into warm milk with an up and down motion. Cover and let rest for 30 to 45 minutes until a clean break is achieved in the curds. A clean break means that you can insert your knife at an angle and the cut fills with whey.
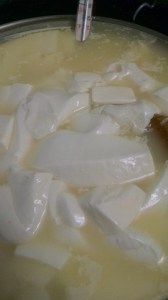
Using a knife that will reach the bottom of your pot, cut curds. You want to make about 1/2 inch squares (*note this is an approximate measurement – I did not breakout my ruler and check it).
The water in the bottom part of your double boiler set up should still be warm enough to keep the now cut curds at 100 degrees. Keep the cut curds at 100 degrees for about 45 minutes.
Scoop curds into cheesecloth or pillowcase. Tie up to make a pouch and hang for an hour. This drains remaining whey from your curds.
After the whey had drained from your curds, place curds into a bowl big enough to mix in salt. Break apart curds with your fingers, add salt in 1/2 tablespoon increments. Mixing well after each addition.
Place curds back into cheesecloth or pillowcase and then into your cheese mold (I use a can with both ends cut out.). Now it’s time to start pressing your cheese curds. You will need 10 pounds of pressure for 10 minutes. Remove cheese from mold and cloth after 10 minutes turn cheese over, rewrap and place back in mold. Press with 20 pounds of pressure for 20 minutes. After your 20 minutes, remove, flip, rewrap and replace. Now it’s time to bring out the big guns. You will need 50 pounds of pressure for the next 12 to 18 hours. (We set ours up and leave it overnight.)
Remove cheese from mold and unwrap. You should have a beautiful block of freshly pressed cheese. Place cheese on a cooling rack and turn over twice a day for approximately 3 days or until the entire block has a nice butter color.
Once the butter color is achieved, you can either refrigerate or dip in wax to age. The longer the cheese ages, the more the flavors develop. Ours has never made it past the fridge.
I hope you enjoy our farmhouse cheddar cheese. I know we do.


